How low can you go? This month’s photo challenges

Next up in our Photo Finish challenge series is low light. Where will it take you?
Camera XYZ in low light: the facts!
Low-light performance? What camera maker ABC didn’t tell you!
I consume a fair amount of photo-related content, so my YouTube feed sometimes seems like an endless stream of clickbait headlines like the above for cameras (for lenses, it’s usually things like Why this zoom’s focus-breathing signals the END OF THE WORLD!).
So ‘low light’: what gives? And why is it such a big deal subject?
In the arms race that is cameras and, in particular, their images sensors — one of the key territories we fan boys fight over is how well a camera deals with low-light situations – ones where, in the days of film, your chances of getting a usable image were practically zero.
This was because the dynamic range, effectively the range of brightness you could record detail accurately, in analogue film was (compared to modern digital image-making) pretty teeny. This meant any fairly dark scene you shot often returned a near black image…
OK, so now we can get great image quality in situations with a lot less light than we used to but, to my mind, what the endless clickbait YouTube titles don’t differentiate is that ’low light‘ is really two things. Firstly, it provides a challenge to capture an image in a dark situation. Secondly, it requires an active creative choice to create a mood, atmosphere or feeling in your image.
Low light, hi tech
Here’s the science bit. Many much cleverer people than I can tell you a lot more about why you can take pictures at an incredible level of ‘if you can see it, you can shoot it!’. But simply put, there is a ton of very clever tech in your Nikon digital camera, to help you take your shot in the dark.
Your sensor
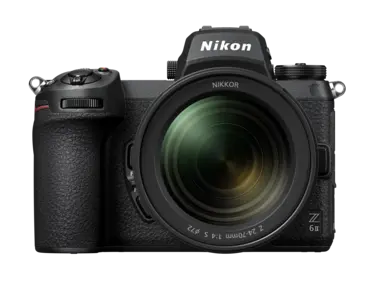
As we mentioned, camera sensors do a lot of the heavy lifting to return a great image in low light. Take Nikon’s Z 9 flagship camera. First up, it has a full frame sensor and a ton of pixels. Unlike, APS-C or crop sensors, its sensor is just physically bigger, and a bigger pixel size captures more light. Simple, right?
Now not so simple is its use of Backside Illumination (BSI). Really this moves the wiring and architecture to the back of the sensor, essentially allowing the front to capture more light. Still with me? (I’m reasonably confident I get this bit, too.)
Then there are the super-duper calculations that go on in the Z 9’s new EXPEED 7 processor. None of which I will even pretend to fully understand. What I do know is it’s weird and it’s magic and I’ll just leave it at that. Bottom line is that even at high ISO numbers, (i.e. increased light sensitivity), the image is still super detailed and grain free.
Your camera body
‘In-Body Image Stabilisation’, or IBIS, has been a must-have feature for any professional camera for a while — and is now appearing on most consumer level cameras, too. Why? It fixes one of the key challenges when shooting in low light. To let more light in, one solution is a slower shutter speed. The longer your shutter is open, the more light it lets in. But the slower this speed, the more likely you’ll see the very slight camera shake of you holding it. Result? A less sharp or even a blurred photo.
IBIS actually physically moves the sensor to compensate for this movement. I can now shoot six to seven shutter speeds slower than I used to and still be pretty confident of a pin-sharp image. That’s a load more light I’m letting in than I did 30 years ago — even with my hands shaking a lot more now I’m older!
Your camera lens
First up, just as IBIS is stabilising the sensor as it collects light, your Z series lens has its in-built Optical Image Stabilisation (OIS) doing the same, stabilising the image as it passes through its optics. Best of all, both body and lens can now talk to each other, enhancing the total stabilisation effect between them, meaning you can go even slower with your shutter speed!
Pretty clever, right? But the cleverest development in these Z series lenses?
It is, wait for it, the hole is bigger.
I must have shot a million frames with Nikon’s original F mount lenses. I still have several of them just because I love their sharpness and how they reveal bokeh. And a million other photographers did the same too — some of the most famous photos you’ve ever seen were shot with an F mount NIKKOR lens.
When in 2018 Nikon announced it was introducing its new mirrorless Z mount glass alongside its first mirrorless cameras, the Z 6 and Z 7, it was, photographically, practically a ‘Dylan Goes Electric’ moment (seriously, it broke the internet, but then we photographers should probably get out more).
What did the change mean? First up, optically, as I said, the hole was just bigger, and bigger means more light. This physical change also meant the distance of the lens to the sensor (originally film in the F mount) could be reduced.
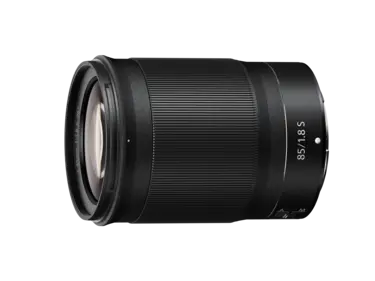
So, if you thought NIKKOR lenses were great, and I did/do, then get a load of what their optical engineers could do with this new Z mount. Wider apertures, more compact bodies, less aberration and distortion meant the Z series packs improved performance in smaller packages.
Add to that increased lens ‘throat’ having more electronic contacts to connect to your camera with, and you now have a super-smart camera talking to a very clever lens achieving autofocus quick-smart in impossibly low-light situations, ones where I’d struggle to do it manually at any speed (my eyes also aren’t getting any younger).
Your image file
If you’ve read any of my other articles, you’ve probably heard me bang on about shooting in RAW (and I’ll never stop, do you hear me!?).
Why? RAW’s ability to recover detail from shadows is ridiculous. This part of the dynamic range is incredible – the Z 9 boasts something like 12 stops of light detail in the same image! So even from a dark image, you can still get back a ton of detail.
And this is where all that camera science sways a little towards camera art. Way back when, when I was considering going full digital, I tested several systems, and it was the Nikon ‘NEF’ RAW file format that I thought just had something more ‘poetic’ about it. It wasn’t just that I got to keep my existing lenses (handily, there’s the Mount Adapter FTZ II to continue using your old F-mount lenses) that made me stick in the Nikon fold, there was something about those test images I shot, especially when the lights were low, that had something ‘more’ to them. I really felt the NEF format went beyond simply getting a decent image when it would have been impossible to getting a great image however challenging the actual situation.
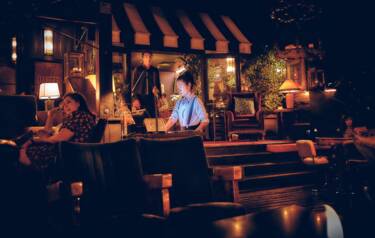
Hello darkness my old friend
OK, so hopefully all that clever stuff shows that you can relax, breathe deep, and know you can get a useable image in a tricky, fairly dark scene. But one thing that bugs me about the endless laments of our YouTube friends, is that low light is often portrayed as a negative to be overcome, rather than a positive to be embraced.
Using low light creatively can be a hugely powerful way to make your photography stand out. Most images we see every day are from a smartphone working overtime to make everything in the scene appear to be lit at the same level. In my last article, on black and white photography, I mentioned photographers such as Bill Brandt, who actively looked for low-light situations to add atmosphere and drama. Photography pioneer Julia Margaret Cameron might have had huge technical challenges in the mid-1800s to even get an image onto her camera plates, but the dark, brooding images she created still have real power over a century later.
Interestingly, while digital still imagery has moved fashion-wise to quite stark and bright (yes, I know that’s a sweeping generalisation, but social media tips the scales massively on this), our film and TV friends have really embraced the dark side in their compositions. As with stills, new tech has meant incredible results from cameras in very low-light, smaller, more portable LED lights, allowing for incredibly atmospheric compositions, creating a huge narrative depth.
Cinematographers, from the legendary Gregg Toland to modern masters like Roger Deakins and Rachel Morrison, use ‘practical’ light sources (i.e. you can actually see them in the frame) with this low-light rendering large areas of the frame as almost black, creating a hugely atmospheric negative space within it.
Over to you
Here are some low-light challenges to really brighten up your day.
Challenge set 1: Push it real good
If you are new to your Nikon Z, and also the NEF digital negative format, it’s worth really digging into just how far you can push this format.
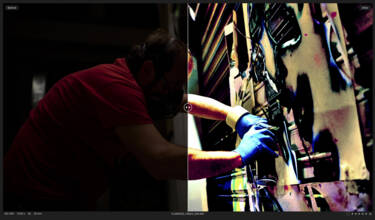
Check out this image of a graffiti artist I shot in Florence. Looks like it was brightly lit?
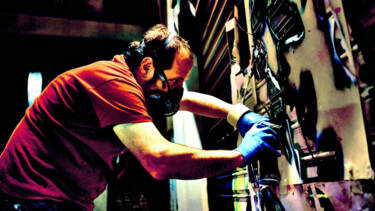
Not really, check out the image unretouched in this side-by-side screengrab. I deliberately massively underexposed to show just how much detail can be drawn out of even the dimmest image. And, by really pushing it, you can create a powerful dramatic look. Hopefully that’ll give you the confidence to really embrace low light as a creative force, not an inconvenience.
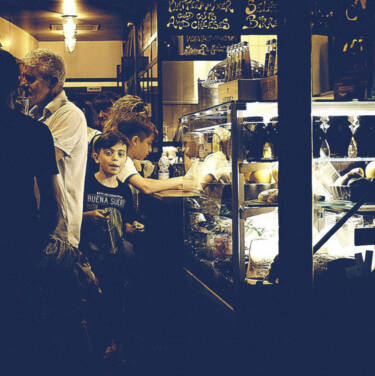
Beginner: Don’t be afraid of the dark!
Hit the streets and see how much you can squeeze out of every light source around. Take this image of a Rome café. It was pretty dark, but every light source, from the counter display to the low interior lights, add up to a very complex combination of lights and decent level of brightness – much more interesting than a bright daylight interior.
Enthusiast: Let there be light
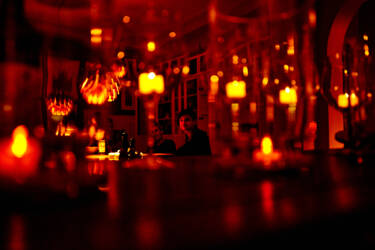
Chances are, there is always some light source around, and sometimes, rather than use that to just provide illumination, you can work it into your composition. Take this image of Courtney. The bar was pretty pitch black,(as bars generally are), but had these very cool low-lying light bulbs, so why not actively use that in her portrait?
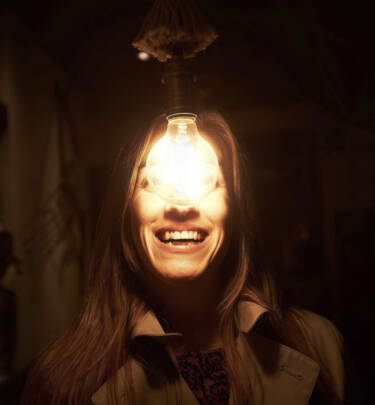
Your challenge? To make your light source a virtue in your shot. It’s a powerful narrative device in an image when you have a very obvious ‘motivated’ light source. It doesn’t have to be as extreme as in my shot. A neon sign, a laptop screen, even the torch on your phone – there’s always something you can use not just to help light your scene, but to actively make it the star of the show.
Advanced: Don’t go against the grain
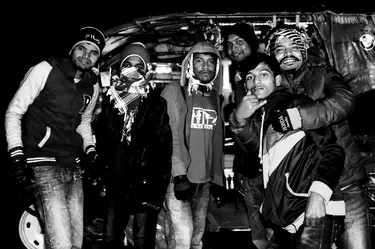
As we’ve seen, you can push a RAW file pretty hard, especially if you shoot at a low ISO. Most people want to lose noise/grain from their image, thus preserving sharpness and detail, but sometimes it’s fun to go back to the old-school fast-film look that had grain as big as pebbles. Take these shots, one of a Milan canal and another of some Bangladesh cab drivers. I went all in on a high ISO, over 2000 in both cases, and I didn’t try and be cute or clever in processing. These are pretty much out of camera – with that grain giving a very gritty documentary look.
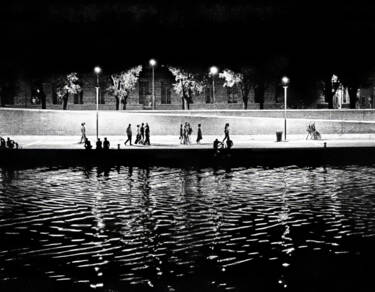
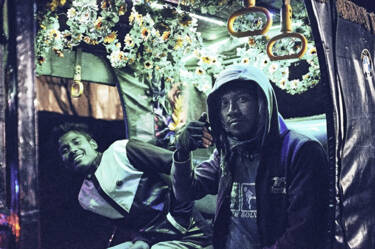
So challenge yourself, head out and, instead of trying to shoot with as low an ISO as possible to eliminate grain, lean right into it. When you crank up your ISO number, it’s like turning on infra-red goggles in your viewfinder! You’ll open up a whole new night-time world of potential pics and get a totally different feel and texture to your images.
Professional: World in motion
In the tech part of this article, we spent some time finding out about how all this clever IBIS and algorithm stuff meant you could shoot with much faster shutter speeds, allowing for much sharper pictures. What if we go the other way?
Take these skateboarders in Ghana. It was a super-flat grey twilight and really dull, leading to a similarly dull picture. The idea of flash portraits didn’t seem to fit the ‘street’ look I was after. In the end, I just opened the shutter to paint the frame with movement in both the skaters and the lights, creating an almost abstract feel.
Set yourself a challenge by going long with your shutter. Look for movement such as car lights or street lights travelling across your frame — and even move yourself. It’s trial and a lot of error, but it’s also a very fun and challenging way to get that little available light you have and use it to paint your frame in compelling and unexpected ways.
Challenge set 2: What we do in the shadows
As an assistant, I must have set up hundreds of classic key, fill and hair light flash set-ups for the photographer. Then when I started to make my own living as a photographer, I got my assistants to set up hundreds for me! Did that set-up produce some of the favourite people shots I took or at least worked on? Probably not. I’m generally much more of a fan of the more ‘oddly’ lit portrait than the super-sharp, super evenly lit studio-style shot.
So, how can we use the experience we gained in the previous low-light challenges when shooting people, and use that use low light to help create a strong narrative image?
Beginner: Au naturel
From the previous challenge set, we now know we can shoot in pretty low light and not need any additional light on the source. For portraits, though, you can often get slightly flat and dull results without extra lights or at least a modifier like a reflector. But, before you reach for a flash brolly, think, what can you do with what you have, light wise? (For a guide to how to make the most out of inside light, click here).
Check out this portrait below. It was a pretty dark room, but I wanted to keep a very cool, unlit feel without it being ‘flat’, so this time, I deliberately didn’t break out the flashbulbs.
There was a fluorescent ceiling light, which is to Lorenzo’s left, side-lighting him slightly. Then there was a very dark, large space to his right, which sucked light out of the left side of the frame. Standing him where these contrasting areas met gave his face and body some very flattering modelling, or ‘3D’ feel.
Then I had him stand just far enough away from the neutral grey wall background, so it would pick him out in his black T-shirt. With my camera working hard in its low light performance, the lens’ stabilisation meant I could shoot pretty fast and know that my autofocus, even in a reasonably dark scene, would be getting the eye sharpness bang on.
And… Voila! I had an understated feel that wasn’t being overpowered by a big artificial light source.
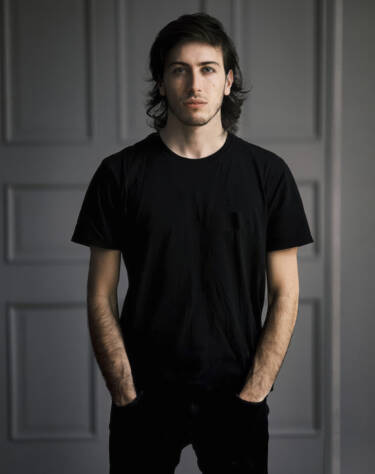
Your challenge? Without a dominant bright light source, or any modifiers like a reflector, create a portrait with depth and interest.
Enthusiast: Night lights
Another great thing about heading out after dark and relying on the ambient lights of the night is that pretty much all of them are not ‘white’ in terms of colour temperature.
From colourful neon and sodium streetlights to shop windows, none of these sources are ‘white’ lights and can produce some very interesting colour effects in your image. Even better, you often get very different light types in the same space for an even more impactful look.
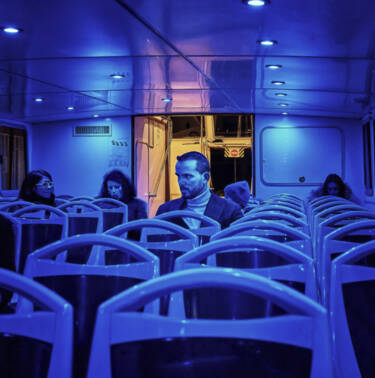
In this image from one of Venice’s vaporetto water buses, the mixed light sources made a perfect frame for the guy in the middle, plus, the very low light in the cabin drained the scene of almost all colours apart from orange and blue, leaving behind a striking duotone effect.
Grab your camera and go and look for people lit by as mad, odd and plain mixed up-lighting as you can find. Remember, even if your camera image file seems to be a little undercooked at first, a quick push on those contrast and saturation sliders in post, can increase the impact of these light sources on your image.
Advanced: What we do in the shadows
Finding dark spaces to shoot from are a great way to create a frame within a frame and build layers of action and detail in your shot. If you can be brave and embrace these negative spaces, you can use this contrast to turn your subjects into almost abstract figures.
In this picture of a schoolboy in Liberia, the school’s interior corridor was dark, and the bright light from the classroom windows was struggling to light him in any meaningful way. It created a very striking silhouette and almost monochromatic image with its own internal frame.

Shooting from a dark, low-light space towards a brighter area with your subject near where these areas ‘meet’ can create interesting planes of action in your shot. If you stop fretting about getting an eye-contact, evenly lit, smiley portrait, your creative opportunities can really open up. Actively look to combine contrasting areas and odd angles from your low-light location and use its darkness to help you create frames within frames.
Pro: It’s the idea, not the gear
First up, I admit, this challenge is a bit of a cheat! Often I find my mind drifting into a slightly polarised thinking. For a ‘professional’ (i.e. paid) job, I pack a flash/flashes, back-up flashes, lights, batteries, back-up batteries, chargers, reflectors, the big sensor full frame, the back-up full frame, you know, the whole enchilada. Shooting for fun? I grab my Z 6II, a pancake lens and go nuts.
Sometimes, I just feel the problem with bringing the big guns like big lenses and lights is that you lose a lot of spontaneity. I’m seeking to control the situation, not make the most of it (as in all the preceding challenges). Also, non-professional subjects can get very conscious quite quickly of loads of lights around them, which makes them ‘stiffen up’ a little in their pose.
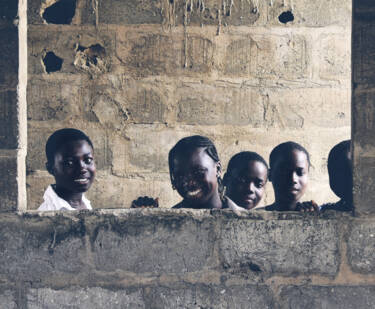
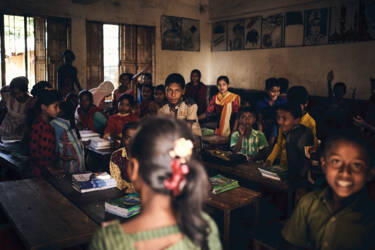
Take this image of some girls at an orphanage in Togo. Nothing, technically, is ‘right’ about it. None of them is properly lit. They aren’t posed in a neat line. The background is way brighter than they are. It’s not even that sharp. I wasn’t even looking through the viewfinder (talk about hit and hope!). Oh, and it was totally the wrong exposure for the scene as I was working in Manual and didn’t have time to change it.
It’s not a ‘pro’ shot by any metric. And yet? It’s one of my favourite people shots I’ve ever taken.
The only reason that I got anything from this shot, is that this was from my first digital camera, the inestimable Nikon D800, and it pulled an incredible level of detail from practically nothing. And think, D800’s tech was launched 12 years ago (mine is still going strong!), so imagine what can be done with a modern Z series camera?
So, what does this mean for the ‘pro’ challenge? Well, weirdly it’s the easiest, but the most important one, and one every level of photographer should try.
Pack… nothing (except a camera and your lightest lens, of course). Grab a willing subject or people, be in a place with lighting conditions you have no right to get a usable image from, and see what you can achieve.
The lowdown
Remember, as with my last Photo Finish, if you’re starting out, don’t be put off by a ‘pro’ label on a challenge. Anyone can try any of them (and should). You’ll be surprised how often a beginner can give us jaded pros a run for our money.
Go to the dark side
Underpinning all these challenges is the idea of low light as a positive force in your pictures.
Remember, the performance of the new Z mount lenses, the incredible colour science of NEF Raw files and the clever camera calculations that happen in between mean your gear is a total safety net. Ninety-nine times out of a hundred, you will get a useable image, so stop fretting about low light and get out there and create some real drama.
In the end, thank you Nikon Z. I’m no longer afraid of the dark, and nor should you be!
More by Dom Salmon
Discover our Photo Finish series
Wisst ihr, wie man im Schnee fotografiert? Hier könnt ihr euer Wissen überprüfen
Ihr wisst schon alles über Langzeitbelichtung? Hier könnt ihr euer Wissen beweisen
Lassen Sie Ihrer Kreativität freien Lauf
